
Hello and welcome to this post on EQ, if you’re anything like me, you might be struggling to wrap your head around all the mixing tools that are at your disposal. Processing tools like EQ and Compression, or perhaps its understanding effects like Reverb and Delay that’s getting to you. If so, then this Mixing Tools series is for you.
I will try my best to keep everything short, jargon free and straight to the point. When I get time I will post a new topic that will will introduce a new Mixing Tool, and by the end of the series, I will consolidate all the information into a handy reference book that you can download from my website.
Equalisation (EQ)
Regardless of who you are, we have all heard of the term EQ, and to top it off, most of us have used some sort EQ in the past. “That car radio has no bass” So we adjust the bass, “I can’t hear the guitars through my iPod” We turn the Mids and Treble up. There you have it, you have used EQ before to fix a situation, now lets dive a little deeper and widen your understanding of EQ.
Considered as the most important tool in a sound engineers arsenal, it can turn a muddy instrument into something with clarity, it can add more body to a track that sounds weak and thin, and it can be applied to a full mix to give it warmth and detail.
What Does It Do?
Essentially it aids you in shaping the sound, by either increasing or decreasing the volume of certain frequencies within the audio spectrum.
Why Should I Use EQ?
The most popular reasons we turn to EQ is to help resolve a poorly recorded instrument, or create space and separation in an overall mix, allowing other instruments to break through and breathe. There is of course other reasons to use EQ, such as creating an unnatural sound, or recreating the sound of an old radio or megaphone. Manipulating audio to sound the way you like.
EQ Types
Parametric
Excellent for shaping the sound whether it be cutting or boosting.

You can also narrow the bandwidth making it easy to target specific or nuisance frequencies within the audio spectrum.

When working with parametric, you want to consider how many bands you need, in the above examples I have used two bands. I find that I rarely use more than four bands, so the default EQ in Cubase or Logic suits me fine and should be a good starting point for you.
Low Shelf (High Pass Filter)
Great for cutting unwanted low end, and clearing muddiness from your mix. Probably the filter I use most, I tend to put it across all instruments with little to no bass. If you have ten tracks with no low bass or low frequencies, its good practise to filter these, you’re probably thinking “Why, there is nothing there”. Well each track is contributing a small amount of noise to the low end, add all ten tracks together which is the case in your mix, and well, that small amount of noise on each track has turned into an issue that is in fact mudding your mix. I like to resolve this before using EQ on bass instruments.

In your DAW you normally have a few different Low Shelves to choose from, which slightly affect how the frequency spectrum is cut. The example above has an inward curve, where as the one below has an outward curve, cutting more off the low end.

High Shelf (Low Pass Filter)
The exact opposite of Low Shelf. Allows low frequencies to pass through while cutting the high frequencies. I would tend to use this on the majority of bass instruments, allowing the higher register instruments to have more presence, air and clarity.

Graphic EQ
Another common EQ tool used in both live sound and studio situations. Graphic EQs have a range of filters spread across the frequency spectrum. This allows for quick and easy EQ in smaller band ranges, but can also consume precious time on larger band ranges, particularly if you don’t know were to start or what you wish to achieve.

In the example above, we have ten bands to choose from, which I find in most cases is enough to achieve your desired goal.

The above example is a thirty band EQ. With this you have the ability to be more specific with the frequencies you decide to cut or boost. If you are only beginning to use EQ in the studio, I would advise to stay away from large graphic EQs until you can better identify which frequencies you would like to target or adjust.
Channel Strip EQ
Channel EQ strips are becoming very popular, most users however simply can not afford this type of hardware, especially in the early years of starting your career. Most however can afford a few digital versions, which attempt to clone the hardware via software, and for the most, these emulations do a stand up job.
The main reason you might want to use a channel EQ strip in your mix, is to add some analogue character that you can’t get when recording digitally. These emulations or the hardware itself, add subtle harmonics to the track your working on, in turn giving you a thicker, warmer, and brighter sound depending on how you decide to use it.

Above is an SSL EQ channel strip which is modelled on the same EQ found on classic SSL mixing desk. Why would you use it?, well to get a similar sound on what is found on SSL mixing desk worth over £20,000. Is it the same? No, but it’s close, and it does add colouration to mix, which is why you probably decided to use it in the first place.
Channel Strip EQ’s come in many variations and it all depends on your personal taste as to which one you prefer.
If you are confused by the knobs on the these EQ’s, don’t be intimidated, after two minutes you should grasp the concepts that matter.
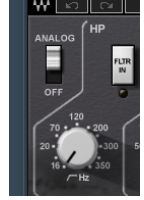
Analogue circuitry enabled, HP for High Pass Filter, switch this on to cut low rumble bass frequencies in your track. HZ which frequencies should the filter cut, options range from 16hz to 350hz. This is a low shelving EQ just like the one discussed earlier.

LF (Low Frequency Filter). Boost or cut within 30hz to 450hz. This can be useful if your low shelf has cut too much, but reducing the low shelf seems to add rumble, try boosting around 300hz on your Low Frequency Filter to see if it resolves the issue.
MLXLS

LMF (Low Mid Frequencies) allows you to target low mids. Adjust +/- to boost or cut.
This icon is the same as the parametric EQ we discussed earlier, and adjusting this decides between a narrow or wide frequency band.
KHZ decides where the frequency band should function, ranging from 200hz to 2.5khz.
Once you understand this much, the same concepts apply for HMF (High Mid Frequencies) HF (High Frequency Filter). This EQ also has a few added functions that I have not yet mentioned, but if you can grasp what you have learned so far, you will get good results. If you must know the other features, the divide and multiply icons simply divide or multiply the selected frequency by three. For example using the LMF filter, and enabling the Divide 3 on 2khz, will mean I am cutting or boosting at 660hz. This can be useful if you want to cut or boost a certain frequency but are struggling to get it with the fixed controls. I honestly rarely use this feature, but I can see why it is useful.
From what we have discussed so far, you will start to get a grasp and understanding of most Equalisers, either software or hardware based. There is however a couple more that can be useful to you and your knowledge of EQ.


Above is the PulTec rack EQ and the Puigtec emulation from waves. There are more variations and clones of this hardware and software, with arguably the best emulation coming from UAD. I thought it was worth mentioning as a lot of recording studios will have some version of this at there disposal, and you can get excellent results that you can’t achieve with standard EQ, so you may as well get the most out of it, and understand the controls. This EQ adds colour, and even sounds nice as an insert with no adjustment.

On the left side we have three controls for shaping the low end of the mix, Boost, Attenuation and Low Frequency. The thing that gets most people confused with this EQ is that you boost and cut the same frequency. Why bother using it then? Well… the added colour is nice, but more importantly, when you boost and then attenuate which means Reduce, you are not exactly cancelling the sound or the adjustments you made, you are essentially creating a resonance within the frequency band you are working with. This allows you to clear any muddiness on an individual track, or on your entire mix if mastering, while at the same time creating clarity, warmth and thickness within the low frequency spectrum.

On the right side, we have more controls with rotary knobs Boost, Attenuation, Attenuation Selection (Frequency), Bandwidth and High Frequency. Now that we know what Boost and Attenuation do, we need to look at Attenuation Selection. This is going to select the frequency band we wish to reduce. Bandwidth we should understand by now, it is the range of frequencies, a wider band means more frequencies within the band will be effected by our adjustments, while a narrow or sharp band will effect less frequencies. The High Frequency knob, will allow you to boost your desired frequency.
Hopefully this helps, and if you come across this piece of hardware or software, I would advise giving it a go, and don’t fear its controls. Its quite responsive, use your ears and you will hear what it is capable of.
Linear Phase EQ
Another common EQ type you may come across is the Linear Phase EQ. So what does it do?, well… when using a standard EQ, you have a slight delay between each filter that you use, which in some cases can cause phase or a slight slur. I must say that this is something that will rarely happen for most users, and standard EQ is fine. However, if the issue should arise, then using a linear phase EQ will keep all filters 100% in sync. This can be explained in much greater detail, but for me, this explanation is fine and cuts though the jargon.
If you want to keep your track or mix 100% colour free, and free from any artefacts that can be introduced by regular EQ’s, then Linear Phase is probably the way to go. For me I prefer the sound of colouration and the small artefacts that can be introduced by regular EQ’s, and because of this, I rarely use Linear Phase EQ.

This example is the LinEQ from Waves. It’s a standard setup and should look familiar to you, as the layout, look and feel is similar to that of Cubase and Logic.

One really good feature of this EQ, is that at the bottom of the interface you can adjust the type of filter in use, making it quite versatile in every situation.
The final EQ I would like to add to the list is relatively new, and was designed by Voxengo. Its their Curve EQ. It removes all limitations you get from regular EQs, and gives you freedom to shape the sound as to how you see fit. I find it very useful for sound design and creating unique and new sounds, but it can be applied for regular purposes also.

Tips
Hopefully you now have a good understanding of the different controls and functions of various EQs. Now lets look at some quick tips for getting the most out of your EQ.
Frequency Sweep
Frequency Sweep is a very useful skill to learn. Simply boost, and narrow your frequency band, then slowly glide across the frequency spectrum searching for unwanted frequencies. Once found, then cut. When everything sounds good, try repeating the process but this time, boosting frequencies that sound good, and widening your bandwidth to make the boost sound more natural.
Poor Recording
If its poorly recorded audio, I would highly recommend re-recording, don’t spend too much time trying to resolve poorly recorded sounds. Everyone has been there at some point, and there isn’t much that EQ can do in these situations.
Listen to The Mix
This is very important, if you are listening to the track in solo and making adjustments, then by the time you switch back to the full mix, you may find your track disappears, or worse interferes with other instruments.
Create Space
Create space for other instruments to breath, this can be easily achieved, for example, reducing 1/2DB off 500hz on guitars, then boosting bass by 1/2 DB in the same region, can create clarity in the low end of your mix, making the bass more audible, and less muddy. Apply this concept to other instruments, by studying their dominant frequencies, and slightly cutting the same frequency from other instruments that do not need or acquire the same space.
Subtle
Sometimes using little to no EQ can be your best option, if it sounds good, then why not leave it as it is.
Colouration
Try adding a channel EQ if your mix is sounding lifeless or too digital. Sometimes by just adding the same EQ across a wide selection of tracks, even if the EQ is not used, the colouration can add a nice glue to the mix, helping instruments sit better together.
Pre-Sets
Pre-sets can be a life safer and your best friend when you are starting to train your ears to recognise certain frequencies. Watch how it alters the sound, and learn from it. They are always a good starting point, even for advanced users, load a pre-set, then tweak it until it sounds perfect.
Experiment
Because there are no rules, if it sounds good, then it probably is good.
Time
Time it's of the essence, try spending no longer than 2 minutes adjusting the EQ, any longer than that, you may find your causing more bad than good.
Hopefully this has answered some of your questions on the magical tool that is EQ. If you think I left something out, then please post a comment and I will update the article.